If you’re looking for a creative way to get the kids outside and encourage imaginative play, a mud kitchen is a perfect weekend project. It’s budget-friendly, fun to build, and totally customizable to your space. Here’s a full step-by-step guide—complete with measurements, cuts, and cozy design ideas—to help you build your own.
What You’ll Need
Lumber List:
All cuts are based on a kitchen approx. 36” wide x 36” tall x 16” deep (adjust as needed).
– (3) 2x4s @ 36” – for the bottom frame (left, right, back)
– (3) 2x4s @ 16” – for the bottom frame sides and shelf depth
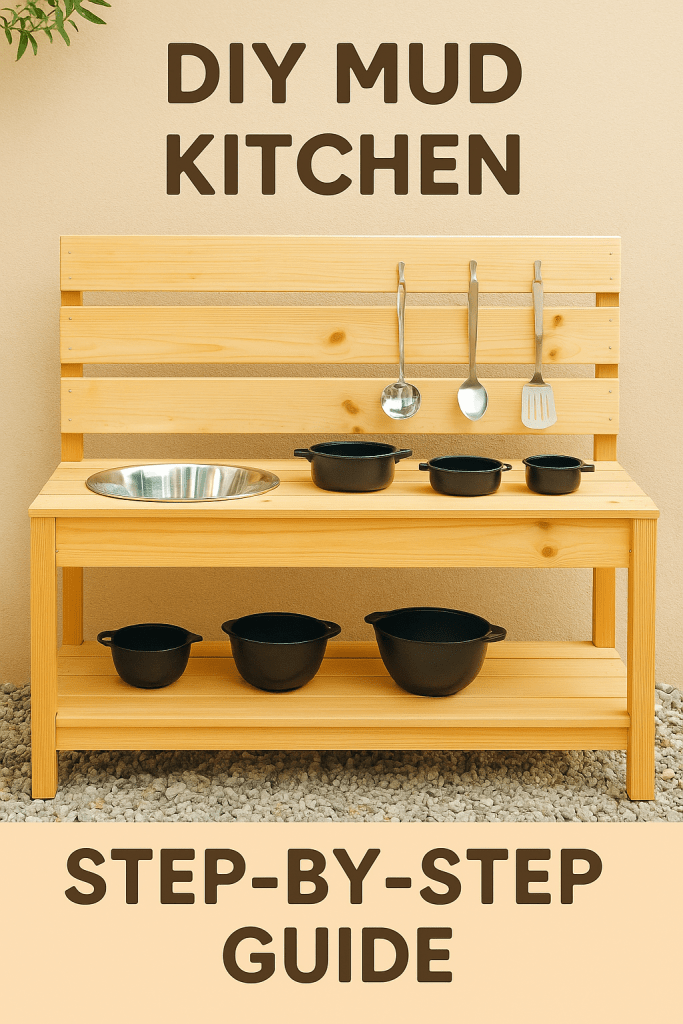
– (4) 2x2s @ 35” – vertical legs/posts (3) 1x6s @ 36” – for the countertop
– (3) 1x6s @ 36” – for the back panel
– (1) 1×2 @ 36” – for support behind the back panel
– (1) Plastic mixing bowl – 10–12” diameter (your “sink”)
Hardware & Supplies:
– Exterior wood glue (optional)
– Outdoor paint or weatherproof stain
– Paintbrush or roller
–Sandpaper or orbital sander or Jigsaw or hole saw (for the sink cutout)
Extras (Optional but Cute):
– Cabinet knobs (for “stove” dials)
– Black paint for stove burners
– Hooks or cup pulls for utensils
– Faux faucet or repurposed sink tap
Step-by-Step Instructions
Step 1: Build the Base Frame
Use (2) 2x4s @ 36” for the front and back of the base. Connect them with (2) 2x4s @ 16” for the sides. Screw together to create a sturdy rectangular frame.
Step 2: Add the Legs
Attach one 2×2 leg (35”) vertically at each corner of the base using 2.5” wood screws. Keep the legs flush with the outer edge for stability.
Step 3: Add the Countertop
Use your (3) 1×6 boards @ 36” laid flat across the top. Screw down into the base frame. Leave a small gap for expansion if using real wood.
Step 4: Cut the Sink Hole
Measure and center your mixing bowl on the countertop. Trace around it and cut just inside the line with a jigsaw. Drop the bowl in—it should rest snugly inside the opening.
Step 5: Attach the Back Panel
Screw the (3) 1×6 boards @ 36” vertically to the back legs. Use your 1×2 support behind them to keep them from bowing.
Step 6: Add the Shelf (Optional)
Use an extra 1×6 or scrap wood to create a small shelf below the countertop for storing dishes or tools. Attach it between the legs using pocket holes or L-brackets.
Step 7: Sand & Paint
Sand all surfaces thoroughly to prevent splinters—especially the corners. Paint or stain with exterior-safe finish in soft, earthy or neutral tones. (Think sage green, warm beige, or whitewashed oak.)
Step 8: Decorate + Accessorize
Screw in hooks for utensils or garden tools. Paint black “burners” on top for a stovetop effect. Add cabinet knobs as pretend stove dials. Style with tin buckets, mini planters, measuring cups, or bowls.
Final Dimensions Recap:
Height: 36”
Width: 36”
Depth: 16”
Counter Height: ~24” (adjust to your child’s height if needed)
Downloadable PDF with full guide and detailed instructions below:

Leave a comment